

How to Take Iridology Pictures? A Complete Guide by MAIKONG CO.LTD
How to Take Iridology Pictures? A Complete Guide by MAIKONG CO.LTD
Why Are Iridology Pictures Essential?
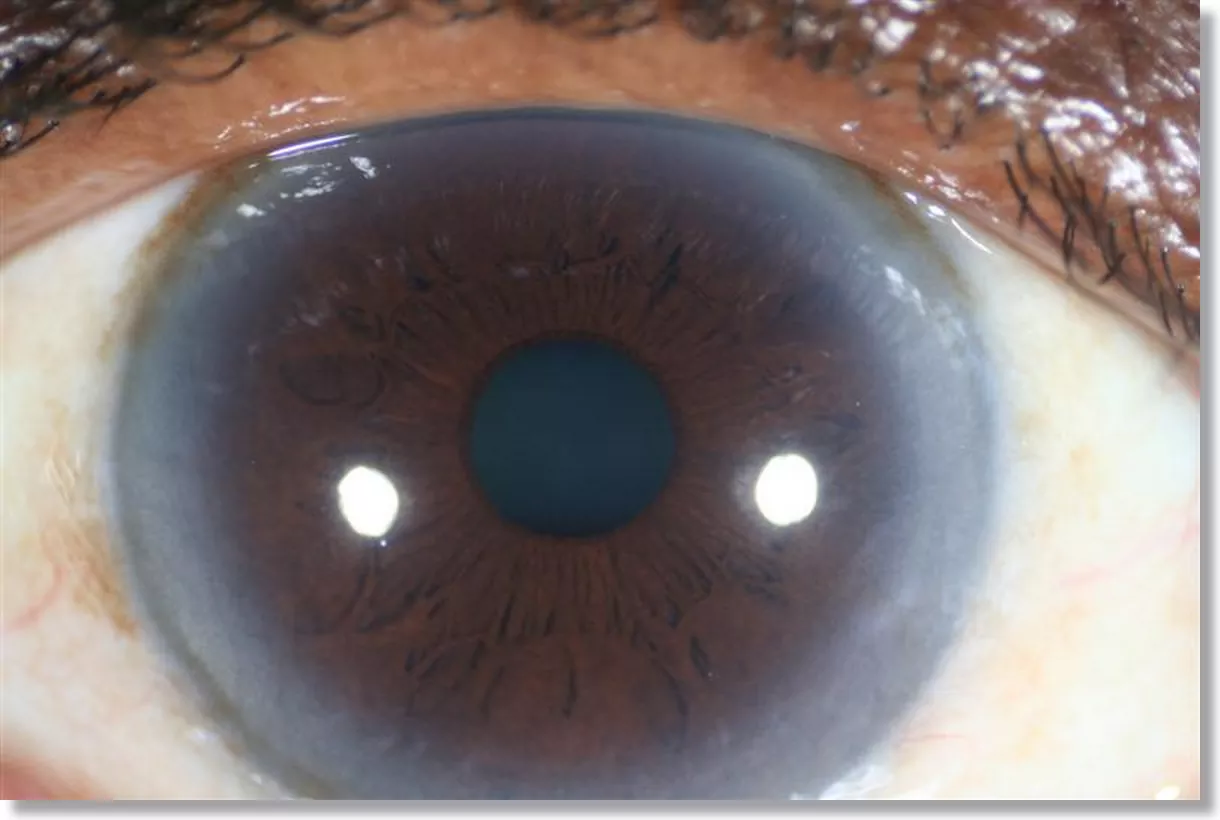
How to Take Iridology Pictures?Iridology pictures are critical for analyzing the iris to assess overall health. They provide a detailed visual of the iris’s structure, patterns, and colors, enabling practitioners to map them against an iridology chart and identify potential health concerns.
Using the right tools, such as MAIKONG CO.LTD’s professional iridology cameras and software, ensures clear, high-quality images that lead to accurate and reliable results.


How to Take Iridology Pictures Step by Step
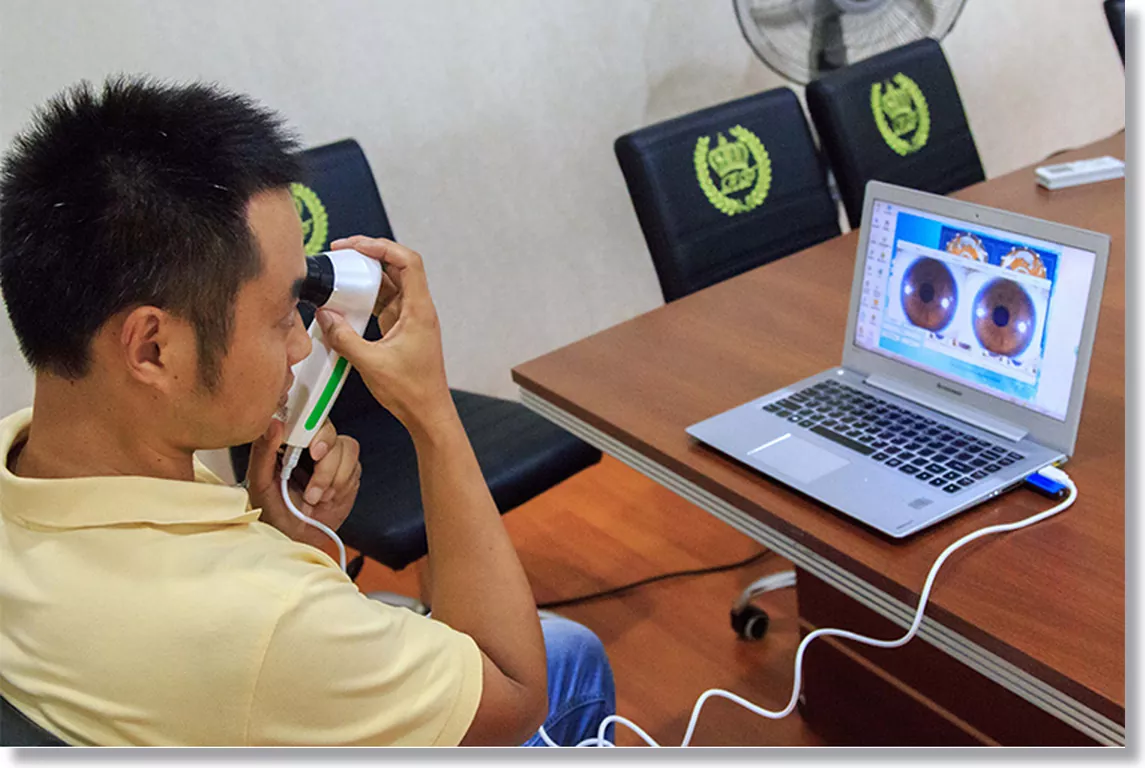
1. Select the Right Equipment
A high-resolution iridology camera is the cornerstone of capturing detailed iris images. MAIKONG CO.LTD offers industry-leading cameras specifically designed for iridology. These cameras provide exceptional clarity, ease of use, and advanced features like built-in lighting.
If a dedicated iridology camera is unavailable, a smartphone or DSLR with a macro lens can be used, though professional equipment will yield significantly better results.
2. Prepare Your Environment
Good lighting is crucial for capturing the fine details of the iris. Follow these tips:
- Use indirect lighting: This reduces glare and reflections.
- Choose a quiet, stable location: Minimize movement and distractions for steady images.
- Built-in lighting for precision: MAIKONG cameras come with LED ring lights for balanced and shadow-free lighting.
3. Position the Camera Correctly
- Sit in a comfortable, upright position with your head supported.
- Place the camera 4-6 inches from the eye, ensuring that the lens aligns with the center of the iris.
- Focus the camera so that the colored portion of the eye fills most of the frame.
4. Adjust Camera Settings
- Enable macro mode for close-up photography.
- Use manual or automatic focus to sharpen the image.
- Set the resolution to the highest available setting for detailed photos.
- MAIKONG iridology cameras automatically adjust these settings for optimal performance.
5. Capture Images of Both Eyes
Each iris corresponds to specific body areas, so both the left and right eyes must be photographed. Take multiple images of each eye to ensure clarity and detail.
Why Choose MAIKONG Iridology Cameras?
MAIKONG CO.LTD has been a leader in health equipment manufacturing for over 21 years, offering iridology tools that are trusted by professionals worldwide.
Key Features of MAIKONG Iridology Cameras
| Feature | Details |
|---|---|
| Resolution | 24 MP High Definition |
| Lens | Adjustable Macro Lens |
| Lighting | Built-in LED Ring Light |
| Connectivity | USB 3.0 |
| Compatibility | Windows and macOS Compatible |
Accessories Included with Each Camera
| Accessory | Purpose |
|---|---|
| Protective Case | Safeguards the camera during transit |
| Calibration Tools | Ensures accurate imaging |
| USB Cable | Provides fast and stable connectivity |
| Installation CD | Includes MAIKONG’s proprietary software |
| User Manual | Step-by-step instructions |
Software Capabilities of MAIKONG Iridology Systems
1. Multi-Language Support
MAIKONG software is accessible globally, supporting analysis in 12 languages:
| Language | Available |
|---|---|
| Simplified Chinese | ✅ |
| Traditional Chinese | ✅ |
| English | ✅ |
| German | ✅ |
| Spanish | ✅ |
| Persian | ✅ |
| French | ✅ |
| Malay | ✅ |
| Japanese | ✅ |
| Korean | ✅ |
| Portuguese | ✅ |
2. Operating System Compatibility
| Operating System | Supported |
|---|---|
| Windows XP | ✅ |
| Windows 7 | ✅ |
| Windows Vista | ✅ |
| Windows 8 | ✅ |
| Windows 10 | ✅ |
| Windows 11 | ✅ |
| macOS | ✅ |
3. Health Reports
MAIKONG’s software analyzes over 190 organ systems, providing detailed health reports with visual overlays on the iris for quick and effective assessments.
Tips for Getting the Best Iridology Pictures
- Minimize Movement: Use a tripod or ask someone to assist in holding the camera steady.
- Use Good Lighting: Avoid shadows and bright flashes; use MAIKONG cameras for built-in lighting options.
- Focus on the Iris: Ensure the entire iris is sharp and centered in the frame.
- Take Your Time: Capture multiple images to find the clearest one.
- Save Your Photos: Organize your photos for easy comparison during follow-up assessments.
FAQs About Taking Iridology Pictures
1. Can I Use a Smartphone for Iridology Photos?
Yes, but professional iridology cameras, like those from MAIKONG, deliver superior clarity and detail for accurate assessments.
2. Do I Need Additional Lighting?
MAIKONG iridology cameras come equipped with built-in LED ring lights, eliminating the need for extra lighting equipment.
3. How Do I Analyze My Photos?
MAIKONG software overlays an iridology chart onto the image and generates detailed health insights.
4. Can I Customize MAIKONG Products?
Yes, MAIKONG offers OEM/ODM services, including branding, software customization, and packaging design.
5. How Quickly Can I Receive My MAIKONG Camera?
Orders are processed within 3-7 days, with delivery via UPS, DHL, or FedEx typically taking 7-9 days.
6. Are MAIKONG Cameras Suitable for Beginners?
Absolutely. The user-friendly interface and detailed user guides make them perfect for both professionals and newcomers.
7. What Is the Warranty for MAIKONG Products?
All MAIKONG devices come with a 1-year warranty covering manufacturing defects.
MAIKONG CO.LTD is committed to empowering healthcare practitioners and enthusiasts with high-quality iridology tools. Our cameras, software, and expert support ensure that taking iridology pictures is accurate, easy, and effective and How to Take Iridology Pictures?